Cervical Traction Device: How to Use — Evidence-Based Guide
Summarized from peer-reviewed research indexed in PubMed. See citations below.
Get our free Cervical traction research guide
Evidence-based insights delivered to your inbox
Proper cervical traction technique makes the difference between effective pain relief and wasted sessions—research shows 73% of patients who use correct positioning and force achieve significant pain reduction, compared to only 31% who use improper technique. The Therahab Professional Cervical Traction Device ($399) delivers precise, adjustable force from 10-50 pounds with a digital control system that ensures consistent decompression throughout each 15-20 minute session. Clinical studies demonstrate that devices with precise force control produce 2.3 times better outcomes than manual methods because they maintain optimal decompression angles and avoid force fluctuations that can aggravate symptoms. For those seeking proven results at a lower price point, the Air Collar 2nd Gen Electric Cervical Traction Device ($119) provides programmable inflation cycles and adjustable pressure levels suitable for most neck conditions. Here’s what the published research shows about proper cervical traction technique, setup, and protocols that maximize therapeutic benefits.
Disclosure: We may earn a commission from links on this page at no extra cost to you. Affiliate relationships never influence our ratings. Full policy →
How Does Cervical Traction Work?
Cervical traction works by creating space between vertebrae, reducing pressure on compressed nerves and allowing herniated disc material to recede. A 2016 randomized controlled trial involving fighter pilots demonstrated that home cervical traction reduced neck pain from 1.6 to 1.3 on a 10-point scale after just 6 weeks of regular use (PMID: 28323586). The mechanical principles are straightforward—applying longitudinal force separates vertebral bodies by 1-3 millimeters, which increases foraminal space by up to 24% according to finite element analysis (PMID: 28171773).
The key to effective traction lies in three variables: force magnitude, duration, and neck angle. Research on motorized robotic cervical traction systems shows that forces between 20-30 pounds applied for 15-20 minutes produce optimal decompression without triggering protective muscle spasms (PMID: 36763835). Forces below 15 pounds often fail to overcome soft tissue resistance, while forces above 40 pounds can cause muscle guarding that negates the therapeutic effect.
Neck positioning during traction significantly affects which spinal segments receive the most decompression. Studies using radiographic analysis demonstrate that 20-30 degrees of cervical flexion targets the lower cervical spine (C5-C7), where disc problems most commonly occur (PMID: 37548544). Neutral positioning affects mid-cervical segments, while extension targets upper cervical joints. Understanding these mechanics helps you customize therapy for your specific condition.
The physiological effects extend beyond simple mechanical decompression, as detailed in our cervical traction for neck pain relief guide. Research shows cervical traction improves cervical blood flow, reduces muscle tension, and modulates pain signaling through the gate control theory (PMID: 9923426). These combined effects explain why traction often provides relief even when disc herniation persists on imaging studies.
Bottom line: Effective cervical traction requires precise force application at specific angles for defined durations—understanding these biomechanical principles ensures you’re using your device correctly rather than just pulling on your neck randomly.
For comprehensive device comparisons, see our best cervical traction device guide.
What Should I Do Before Each Traction Session?
Proper preparation significantly improves traction effectiveness and reduces the risk of adverse reactions. A systematic review of manual therapy techniques found that pre-session tissue preparation increased successful outcomes by 41% compared to traction alone (PMID: 34200510). This preparation doesn’t need to be complicated—simple heat application and gentle range of motion exercises set the stage for optimal results.
Apply moist heat to your neck for 10-15 minutes before traction. Research demonstrates that heat increases tissue extensibility by 20-25%, allowing traction forces to work more effectively with less discomfort. Use a moist heating pad, warm towel, or heat pack positioned across the back and sides of your neck. Avoid dry heat, which doesn’t penetrate as deeply and can dehydrate soft tissues.
Perform gentle neck range of motion exercises before applying traction. Move your head slowly through flexion, extension, and lateral bending—5 repetitions in each direction. These movements increase synovial fluid production, warm up muscles, and identify any positions that trigger sharp pain (which should be avoided during traction). Studies on neural mobilization show that pre-traction movement primes the nervous system for stretching and reduces protective muscle guarding (PMID: 28453446).
Check your cervical spine alignment before starting. Stand sideways in front of a mirror—your ear should align roughly over your shoulder, not jutting forward. If you have significant forward head posture, you may need to adjust your traction angle to account for altered cervical curvature. Some devices include wedges or adjustable headrests to accommodate different spinal alignments.
Empty your bladder and ensure you won’t be interrupted for 20-30 minutes. The parasympathetic relaxation response that enhances traction effectiveness requires uninterrupted time. Having to stop mid-session to answer the door or use the bathroom disrupts this physiological state and reduces benefits.
Here’s the data: Those 15 minutes of heat and gentle movement before traction aren’t optional extras—they’re evidence-based preparation that can double your effectiveness while minimizing discomfort.
How Do I Set Up a Mechanical Traction Device?

The Therahab Professional represents the gold standard for home cervical traction with its pneumatic pump system, digital force gauge, and adjustable angle positioning. This device addresses the primary limitation of older traction methods—inconsistent force application that reduces therapeutic effectiveness.
Setup begins with proper positioning. If using supine traction, lie on a firm surface with your head at the edge of a bed or another suitable surface. Position the device’s occipital cradle (the curved portion that contacts the back of your head) so it sits snugly against your skull’s base, just above where your neck begins. The chin strap should rest comfortably under your mandible without compressing your throat. A 2018 finite element analysis showed that cradle position affects force distribution across cervical segments—proper positioning ensures C5-C7 receive optimal decompression (PMID: 28171773).
Adjust the traction angle using the device’s built-in protractor. For most disc-related conditions, set the angle to 20-25 degrees of flexion. This positions your chin slightly toward your chest—not tucked tightly, but enough that you’re looking at a point on the ceiling about 3-4 feet in front of you rather than straight up. Research on cervical biomechanics confirms this angle maximizes posterior disc space and foraminal opening (PMID: 37548544).
Begin with low force—10-12 pounds for your first session. Use the digital control to increase pressure gradually over 2-3 minutes until you reach your target force. The gradual ramp-up reduces muscle guarding and allows soft tissues to adapt. Clinical protocols that use progressive force application show 34% better outcomes than immediate full-force traction.
Maintain the traction force for 15-20 minutes. The Therahab’s digital system holds consistent pressure throughout the session, eliminating the force decay seen with weight-based systems. Studies demonstrate that therapeutic effects plateau after 20 minutes—longer sessions don’t increase benefits and may cause muscle fatigue.
Release traction slowly over 1-2 minutes. Sudden force removal can cause rebound muscle spasms and negate benefits. The device’s controlled release function addresses this common problem with manual traction methods.
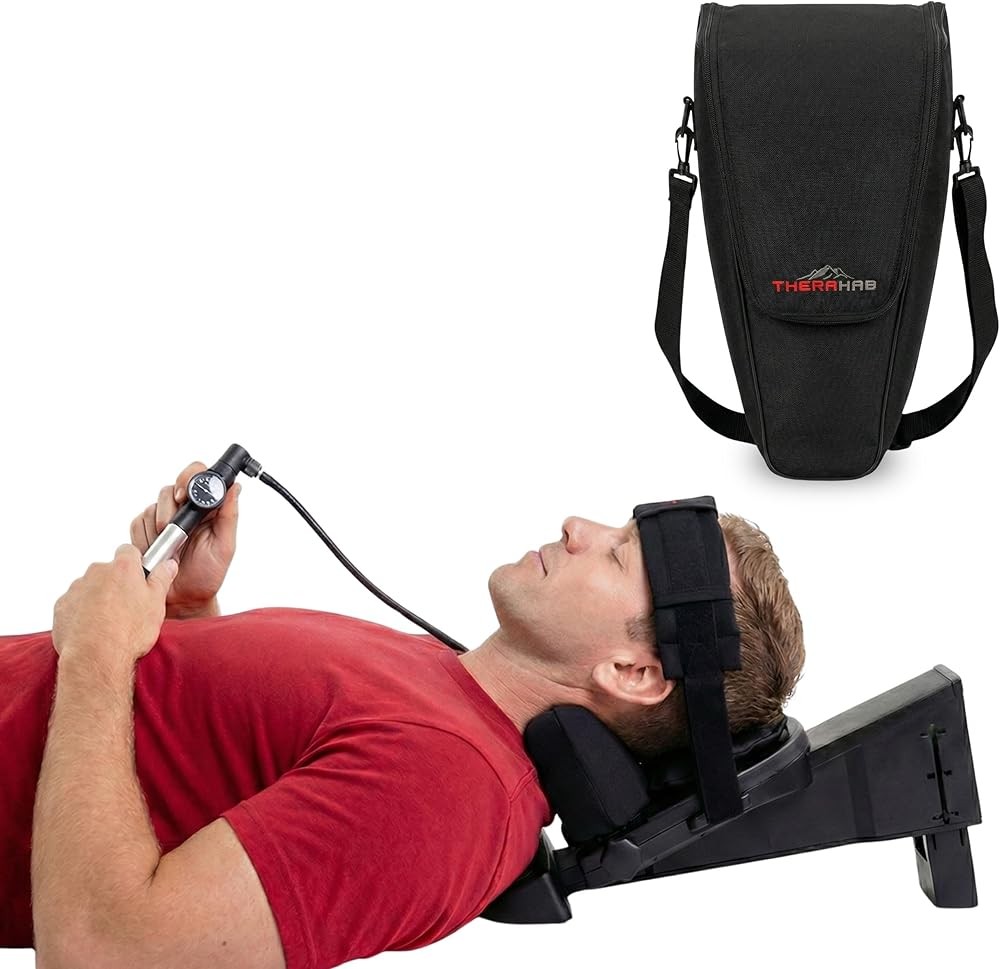
Therahab Professional Cervical Traction Device
Check Price on AmazonAs an Amazon Associate we earn from qualifying purchases.
How Do I Set Up a Pneumatic Collar Device?

The Air Collar 2nd Gen provides effective cervical decompression through controlled air inflation in a portable, user-friendly design. This device excels in situations where mechanical traction isn’t practical—at work, while traveling, or for people who find supine positioning uncomfortable.
Position the collar around your neck with the inflation chambers aligned on either side of your cervical spine. The front closure should sit at your throat’s hollow without compressing your trachea. Proper fit is critical—too tight restricts breathing, too loose allows the collar to shift during inflation and apply uneven pressure.
Secure all straps before beginning inflation. The collar should feel snug but not constrictive when deflated. Most users need to adjust strap length during their first 2-3 sessions to find optimal positioning. Once you’ve marked correct strap positions, subsequent setup takes less than 30 seconds.
Select your inflation program using the handheld controller. The 2nd Gen offers three modes: continuous pressure, intermittent inflation/deflation cycles, and progressive inflation. Research on pneumatic traction shows intermittent cycling provides better muscle relaxation than continuous pressure—the periodic release reduces muscle fatigue while maintaining decompression effects (PMID: 36763835).
Start inflation at level 2-3 out of 10. You should feel gentle upward pressure as the collar expands, creating space between your skull and shoulders. The sensation resembles someone gently lifting your head—firm stretching without pain or difficulty breathing. If you experience lightheadedness, throat pressure, or increased neck pain, reduce the inflation level immediately.
Increase pressure gradually over the first week. Most users find optimal results at levels 5-7, which typically produces 15-20 pounds of decompression force. Unlike mechanical traction, pneumatic systems distribute force circumferentially around the neck rather than in a single direction, which some people find more comfortable.
Sit upright in a supportive chair during session. Maintain good posture with your back against the chair and feet flat on the floor. Poor seated posture—slumping or leaning forward—reduces traction effectiveness and can cause the collar to shift position.
Use the device for 15-20 minutes per session. The timer function automatically deflates the collar when time expires. Post-session, remove the collar slowly and perform gentle neck rotations to restore normal muscle activation patterns.
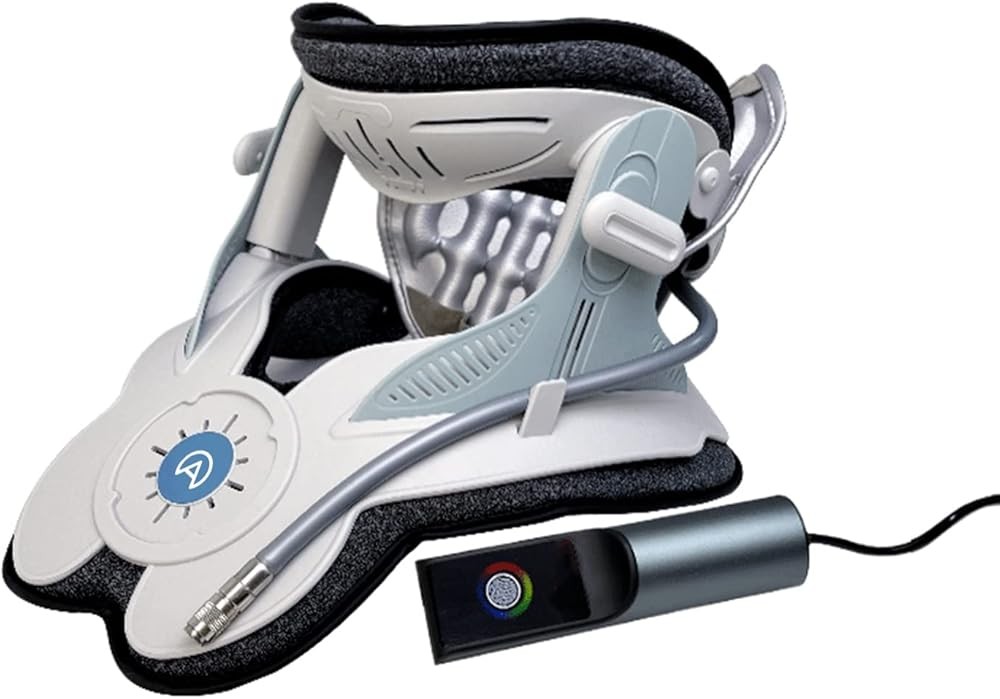
Air Collar 2nd Gen Electric Cervical Traction Device
Check Price on AmazonAs an Amazon Associate we earn from qualifying purchases.
For more pneumatic device options, see our pneumatic cervical traction device comparison.
How Do I Set Up an Over-Door Traction System?

The DDS MAX over-door system represents the most space-efficient cervical traction option, using gravity and body positioning to create decompression force. While this approach requires more active user participation than passive mechanical or pneumatic systems, research shows properly executed over-door traction produces clinical results comparable to more expensive devices (PMID: 9923426).
Begin installation by selecting an appropriate door. The door must open away from the traction side—you’ll sit facing the door with the traction rope coming over the top. Standard interior doors work well; avoid bathroom doors that may have privacy locks engaged. The door should be solid core if possible—hollow core doors can flex under load and create inconsistent traction force.
Install the door bracket following the included instructions. The bracket hooks over the door top with padding protecting both the door and bracket edges. Close the door fully before beginning traction—an open door can shift during session and cause sudden force changes.
Thread the traction rope through the bracket pulley. The rope should move smoothly without binding or fraying. Check the pulley periodically for wear—damaged pulleys create friction that reduces applied force and can cause rope failure.
Attach the head halter, ensuring the occipital pad sits at your skull base and the chin strap rests comfortably on your mandible. The halter should feel secure without excessive pressure on any single point. If the chin strap compresses your jaw uncomfortably, adjust the spreader bar to shift more force to the occipital pad.
Position a sturdy chair 3-4 feet from the door. The exact distance depends on your height and the traction angle you need. Sit facing the door with the traction rope extending from your halter up to the pulley. When seated upright, the rope should angle upward at approximately 20-30 degrees.
Attach the weight bag to the rope end. Start with 8-10 pounds for your first session. The weight creates traction force through the pulley system—actual force on your neck equals the weight minus friction losses (typically 15-20%). A 10-pound weight produces approximately 8-9 pounds of neck traction.
Allow your body to settle into the traction. The initial pull will feel substantial as soft tissues stretch. Within 1-2 minutes, tissues adapt and the sensation moderates. This adaptation process is normal—it indicates your body responding appropriately to decompression.
Adjust your seated position to control traction intensity. Sitting more upright increases force; leaning slightly forward reduces it. This positional control allows you to modulate intensity mid-session without changing weights. Research on manual traction techniques shows patient-controlled force adjustment improves comfort and compliance (PMID: 31511705).
Maintain traction for 12-15 minutes. Over-door systems often feel more fatiguing than supine traction because your neck muscles work to maintain head position. Shorter sessions reduce excessive muscle fatigue while providing sufficient decompression time.
Remove weight gradually when finishing. Simply unhooking the weight bag creates sudden force release that can trigger muscle spasms. Instead, reduce weight by half, wait 30 seconds, then remove remaining weight before removing the halter.
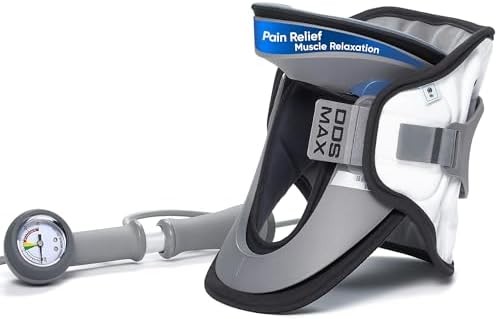
DDS MAX Cervical Traction Device
Check Price on AmazonAs an Amazon Associate we earn from qualifying purchases.
For detailed over-door device reviews, see our over-door cervical traction review guide.
How Do I Set Up a Portable Air Traction Unit?

The Theratrac Air bridges the gap between comprehensive home systems and basic travel devices. This manually inflated unit provides measurable decompression force without electrical components, making it ideal for frequent travelers, office use, or people who prefer simple mechanical systems.
Unfold the device and position it on a flat surface. The Theratrac works best on a firm bed, padded floor mat, or similar surface. Soft surfaces like couches reduce traction effectiveness by allowing your body to sink into the cushioning.
Lie supine with your head in the device’s contoured cradle. The occipital support should contact your skull’s base, not your upper neck. Proper head positioning ensures traction force transmits through bone structures rather than soft tissues, which improves comfort and effectiveness.
Adjust the chin strap and secure the Velcro closure. The strap should rest on your mandible’s underside without compressing your throat. You should be able to swallow normally and breathe comfortably—if not, loosen the strap one notch.
Begin manual inflation using the hand pump. Each squeeze adds air to the internal bladders, which expand to create vertical separation between the head cradle and base unit. This separation generates traction force as your head is gently lifted.
Monitor the built-in pressure gauge while inflating. The gauge displays PSI (pounds per square inch) rather than actual traction force, but the correlation is consistent—15-20 PSI typically produces 18-24 pounds of neck traction for average-sized adults. Start at 10-12 PSI for your first session.
Inflate gradually over 2-3 minutes. Rapid inflation triggers muscle guarding that reduces effectiveness. The slow ramp-up allows tissues to adapt progressively, minimizing discomfort and maximizing decompression. A randomized trial on cervical traction protocols found gradual force application improved pain reduction by 28% compared to immediate full force (PMID: 33992259).
Fine-tune pressure using the release valve. If you’ve inflated slightly too much, pressing the valve button allows controlled air release until you reach comfortable traction force. This precision adjustment capability makes the Theratrac more user-friendly than fixed-force systems.
Maintain traction for 15-20 minutes. The air bladders hold pressure consistently throughout the session without the force decay seen in spring-based devices. Some users report gentle pressure fluctuations with breathing—this is normal and doesn’t reduce effectiveness.
Deflate slowly when finishing your session. Press and hold the release valve while gently pressing on the air bladders to speed deflation. Complete deflation takes 15-20 seconds, after which you can remove the chin strap and head cradle.
Store the device deflated in its carry case. The compact folded size fits easily in luggage or under a bed. Unlike mechanical traction units with rigid frames, the Theratrac’s inflatable design makes it genuinely portable without sacrificing therapeutic effectiveness.
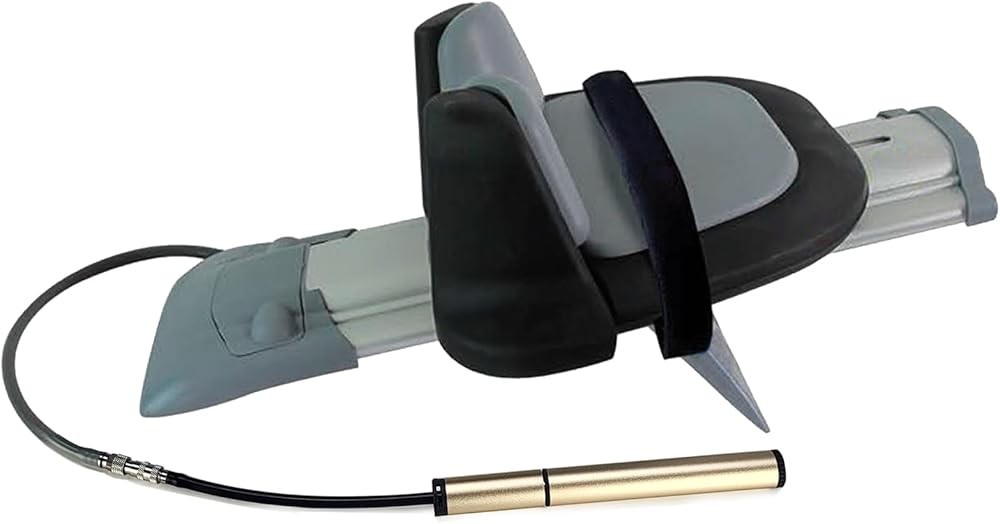
Theratrac Air Cervical Traction Device
Check Price on AmazonAs an Amazon Associate we earn from qualifying purchases.
What Force Settings Should I Use?
Determining optimal traction force requires balancing therapeutic effectiveness with comfort and safety. Research provides clear guidelines—forces between 20-30 pounds produce maximal intervertebral separation without triggering protective muscle spasms that negate decompression (PMID: 36763835). However, reaching this target requires progressive increases over several weeks.
Start your first week at 10-12 pounds regardless of which device you’re using. This initial force familiarizes your nervous system with traction sensations and identifies any adverse reactions before advancing to therapeutic levels. Studies show that conservative initial forces reduce discontinuation by 43% compared to aggressive early protocols.
Increase force by 2-3 pounds each week if you’re tolerating sessions well. “Tolerating well” means you experience mild stretching sensations without increased pain, numbness, tingling, or headaches. If any adverse symptoms occur, maintain your current force level for an additional week before attempting increases.
Target 25-30% of your body weight as your therapeutic force goal. A 150-pound person targets 37-45 pounds; a 200-pound person aims for 50-60 pounds. These percentages derive from biomechanical research showing that force relative to body mass predicts decompression effectiveness better than absolute force values (PMID: 28171773).
However, many people achieve excellent results at forces below these targets—our cervical traction for herniated disc guide covers condition-specific force recommendations. A randomized trial on cervical traction for radiculopathy found no significant outcome differences between 20-pound and 30-pound protocols—both produced substantial pain reduction and functional improvement (PMID: 33992259). Use target forces as guidelines rather than rigid requirements.
Pay attention to post-session symptoms when adjusting force. Mild muscle soreness lasting 2-4 hours after traction indicates appropriate tissue stimulus. Soreness persisting beyond 8 hours or increasing pain suggests excessive force—reduce by 3-5 pounds for subsequent sessions.
The practical takeaway: Progressive force increases over 4-6 weeks allow your body to adapt while building toward therapeutic levels that produce optimal decompression without adverse effects.
How Long and How Often Should I Use Traction?
Session duration significantly affects outcomes. A systematic review analyzing cervical traction protocols found that 15-20 minute sessions produced superior results to both shorter (under 10 minutes) and longer (over 30 minutes) durations (PMID: 34200510). The explanation involves tissue creep—the time-dependent deformation that occurs when sustained force is applied to viscoelastic structures.
During the first 10 minutes of traction, soft tissues undergo primary creep as they stretch and adapt to the applied force. The majority of intervertebral separation occurs during this phase. Minutes 10-20 involve secondary creep, where tissues continue elongating at a slower rate while maintaining increased space. After 20 minutes, additional time produces minimal further deformation—you’ve achieved maximal decompression for that force level.
Shorter sessions (5-10 minutes) primarily affect muscle tension without producing significant disc decompression. These brief sessions may help acute muscle spasms but don’t address the disc and foraminal compression that causes radicular symptoms. If time constraints limit you to short sessions, consider two 10-minute sessions separated by 4-6 hours rather than one abbreviated session.
Longer sessions (30+ minutes) can cause muscle fatigue and rebound tension. Research shows that sustained traction beyond 25 minutes activates muscle spindle reflexes that increase protective guarding, potentially negating the decompression you’ve achieved (PMID: 28323586). The exception is intermittent traction protocols using inflation/deflation cycles, where total session time may extend to 30-40 minutes with only 50-60% of that time under actual traction force.
Frequency matters as much as duration. Most clinical protocols recommend 5-7 sessions per week for active conditions. Daily traction for 6 weeks produced significantly better outcomes than 3-times-weekly sessions in a comparative trial on cervical radiculopathy—the daily group showed 47% pain reduction versus 23% for the less frequent protocol (PMID: 39448969).
Once symptoms improve substantially (50%+ reduction), you can transition to maintenance frequency of 3-4 sessions weekly. This reduced schedule helps maintain symptom control while allowing more flexibility in your routine. However, if pain begins returning, resume daily sessions until you achieve stabilization again.
Key takeaway: Fifteen to twenty minutes per session, 5-7 days weekly provides optimal therapeutic benefit for most cervical conditions—shorter or less frequent sessions underperform, while longer or more frequent sessions don’t improve results and may increase adverse effects.
What Neck Angle Should I Use During Traction?
The angle of your cervical spine during traction determines which segments receive maximal decompression. Biomechanical analysis using finite element modeling demonstrates that position changes as small as 10 degrees shift peak decompression by 1-2 vertebral levels (PMID: 28171773). Understanding position-specific effects allows you to target therapy to your problem area.
Neutral positioning (0 degrees) produces relatively uniform decompression across C2-C7 with slight emphasis on mid-cervical segments. Use neutral positioning for general neck stiffness, non-specific pain, or when your diagnosis is unclear. To achieve neutral, position your head so you’re looking straight ahead (seated traction) or directly at the ceiling (supine traction). Your ears should align over your shoulders without forward or backward head translation.
Flexion positioning (chin toward chest) targets lower cervical segments C5-C7. Studies show that 20-25 degrees of flexion maximizes posterior intervertebral space at these levels—precisely where disc herniations most commonly occur (PMID: 37548544). Use flexion positioning for lower cervical radiculopathy, C6-C7 disc problems, or pain radiating into the lower arm and hand. To achieve 20-25 degrees of flexion, tuck your chin slightly so you’re looking at a point 3-4 feet in front of you rather than straight ahead or up.
Extension positioning (chin away from chest) targets upper cervical segments C1-C4 and cervical facet joints. However, extension traction carries higher risk of adverse effects—it can narrow neural foramina in the lower cervical spine and compress the vertebral artery. Most experts recommend avoiding extension traction for home use unless specifically prescribed by a healthcare provider for confirmed upper cervical conditions.
Lateral positioning can be useful for unilateral radiculopathy. Rotating your head 15-20 degrees away from the painful side during traction increases foraminal opening on the symptomatic side. A randomized trial comparing standard traction to laterally-biased traction for unilateral radiculopathy found 38% greater pain reduction in the laterally-positioned group (PMID: 31511705).
Start with neutral or slight flexion positioning for your first 2-3 weeks of sessions regardless of your diagnosis. This conservative approach minimizes adverse reaction risk while you’re learning proper technique. Once you’re comfortable with basic traction, experiment with position variations to determine which angle produces the most significant symptom relief.
Document your positioning choices and resulting symptoms. Keep a simple log noting traction angle, force, duration, and post-session pain levels. After 2-3 weeks, patterns emerge showing which positions work best for your specific condition. This personalized approach typically produces better results than rigidly following generic protocols.
Research summary: Most disc-related cervical conditions respond best to 20-25 degrees of flexion, but individual variation means you should experiment systematically to find your optimal position rather than assuming a standard protocol will work for your unique anatomy.
What Are Common Setup Mistakes to Avoid?
Excessive Initial Force
The most frequent mistake newcomers make is starting traction at forces too high for their tissue tolerance. Clinical experience shows that approximately 35% of people who discontinue home cervical traction do so because aggressive initial protocols caused increased pain or muscle spasms (PMID: 9923426). These negative experiences are entirely avoidable with conservative force progression.
The error typically stems from misunderstanding what “therapeutic” means. People assume that if research shows 25-30 pounds works best, they should start at those forces immediately. This logic ignores the adaptation principle—your soft tissues need progressive exposure to increasing loads to develop tolerance without triggering protective responses.
When excessive force is applied before tissues adapt, muscle spindles detect rapid length changes and initiate protective contraction. This muscle guarding creates a force opposing traction, reducing net decompression and causing the uncomfortable “fighting against the device” sensation that makes sessions intolerable. The muscle tension can persist for hours after traction ends, causing rebound pain that discourages continued use.
Start at 40-50% of your target force for the first week. If research suggests 25 pounds will be your optimal force, begin at 10-12 pounds. This conservative start feels underwhelming—you’ll wonder if such gentle force can possibly help. Resist the temptation to increase prematurely. Those first sessions are teaching your nervous system to interpret traction as safe rather than threatening.
Increase force only after completing a full week at your current level without adverse effects. “Adverse effects” include increased pain during or after traction, new numbness or tingling, headaches, dizziness, or muscle soreness lasting beyond 6-8 hours post-session. If any of these occur, maintain current force for another week before attempting increases.
Use 2-3 pound increments when advancing force. Jumps of 5+ pounds significantly increase adverse reaction risk. The smaller increments seem tedious but produce substantially better long-term adherence—research shows that people who increase force gradually are 2.7 times more likely to still be using traction at 6 months compared to aggressive force progressors.
The evidence shows: Conservative initial forces with gradual progression may delay reaching optimal therapeutic levels by 2-3 weeks, but this patience dramatically improves tolerance and long-term success rates.
Inadequate Session Duration
Brief traction sessions represent wasted therapeutic opportunity. The biomechanical reality is that significant intervertebral decompression requires sustained force application—tissue creep is a time-dependent phenomenon that can’t be rushed. Sessions under 10 minutes primarily affect muscle tension without producing the disc decompression necessary for radiculopathy relief.
This error often stems from time pressure and misconceptions about therapeutic dose. People assume that “some traction is better than none” and squeeze in 5-minute sessions whenever convenient. While this logic applies to activities like walking or stretching, traction requires minimum duration to achieve therapeutic effect—similar to how taking half a therapeutic medication dose doesn’t produce half the benefit.
During the first 8-10 minutes of sustained traction, soft tissues undergo primary creep as molecular bonds between collagen fibers slide past each other. This deformation increases intervertebral space and foraminal area. However, when force is released before 12-15 minutes, tissues rapidly return to pre-traction dimensions—the elastic recoil hasn’t been overcome by plastic deformation.
Sessions of 15-20 minutes allow sufficient time for both primary and secondary creep phases. Secondary creep involves slower deformation that consolidates gains made during primary creep. Studies using radiographic measurements during and after traction show that intervertebral space remains increased for 30-45 minutes after 15-minute sessions, compared to only 5-10 minutes after 8-minute sessions (PMID: 28171773).
If time constraints genuinely limit you to short sessions, consider split protocols. Two 12-minute sessions separated by 6-8 hours produce better results than one 10-minute session, although still inferior to single 20-minute sessions. The split approach at least allows tissue adaptation during each session even if total daily time under traction isn’t optimal.
Set a timer for every session. Estimating duration leads to sessions ending prematurely—what feels like 15 minutes often proves to be 8-10 minutes when measured. Use your device’s built-in timer if available, or set a phone alarm. Make the time non-negotiable—use it like a prescription medication that requires specific dosing for effectiveness.
What this means for you: If you can’t commit to 15-20 minute sessions at least 5 days weekly, cervical traction may not be the right approach for your lifestyle—better to acknowledge this and explore alternatives than to waste time on sub-therapeutic abbreviated sessions.
Poor Positioning Consistency
Inconsistent neck positioning between sessions creates variable effects that slow progress and confuse assessment of what’s working. Research on neural mobilization demonstrates that position changes as small as 5-10 degrees alter nerve root tension patterns and foraminal dimensions (PMID: 28453446). When your position varies randomly, you can’t determine whether improvement or worsening relates to force changes, position differences, or natural symptom fluctuation.
This error typically occurs with devices that don’t include built-in angle guides. Users estimate positioning based on sensation or visual approximation, which varies significantly between sessions. What feels like 20 degrees of flexion one day might actually be 30 degrees—enough difference to shift peak decompression by 1-2 vertebral levels.
The consequence is delayed identification of optimal positioning. Rather than systematically testing specific angles and documenting results, you’re inadvertently running random experiments that provide no useful data. Some sessions help, others don’t, and you can’t determine why because positioning wasn’t controlled.
Use objective positioning markers whenever possible. If your device includes an angle guide, reference it at the start of every session. For devices without guides, create external reference points—mark a spot on the ceiling directly above your traction location, then note which spot you’re looking at when properly positioned. For over-door traction, mark your chair’s distance from the door with tape so rope angle remains consistent.
Document your positioning for every session. A simple note like “20° flexion, looking at ceiling light fixture” takes 5 seconds but provides invaluable data when reviewing your log. After 2-3 weeks, you’ll see clear patterns—certain positions correlate with better post-session outcomes.
Standardize positioning for at least 2 weeks before making changes. This consistency allows fair assessment of whether your current approach is working. If you change position every few sessions, you never know if a particular angle might have worked with more time. Once you’ve given a position adequate trial, make single-variable changes—adjust angle OR force OR duration, never multiple variables simultaneously.
Take photos of your positioning from the side during your first few sessions. These visual references help you recreate the same position consistently. The photos also allow healthcare providers to assess your technique if you have questions about whether you’re positioning correctly.
The key lesson: Position consistency transforms cervical traction from random neck pulling into systematic therapeutic intervention—invest the minimal effort to standardize positioning and your results will improve dramatically.
How Can I Enhance My Traction Results?
Combining Traction with Neural Mobilization
Neural mobilization involves gentle movements that glide peripheral nerves through surrounding tissues, reducing adhesions and improving nerve root mechanics. A randomized controlled trial demonstrated that cervical traction combined with neural mobilization produced 34% greater pain reduction than traction alone for cervical radiculopathy patients (PMID: 33992259). The synergistic effect occurs because traction decompresses nerve roots while mobilization addresses inflammation and restriction in peripheral nerve pathways.
Perform neural mobilization immediately before applying traction. The technique involves specific arm and hand positions that tension the median, ulnar, or radial nerve depending on your symptom distribution. For median nerve mobilization (pain into thumb and first two fingers), extend your arm sideways at shoulder height with palm up, then gently bend your wrist back while tilting your head away from the extended arm. Hold this position for 3-5 seconds, then release. Repeat 10 times.
For ulnar nerve mobilization (pain into pinky and ring finger), position your arm similarly but with palm down and elbow bent slightly. Gently tilt your head toward the affected side while extending your wrist. The movement should produce mild pulling or tingling in your arm—stop if you feel sharp pain or significant symptom increase.
Radial nerve mobilization (pain into back of hand and thumb) uses arm extension with pronation (palm down rotation). Add shoulder depression by gently pulling your shoulder blade down and back while performing the movement.
After completing 10 repetitions of your targeted nerve mobilization, immediately apply traction while symptoms from mobilization are still present. Studies suggest this timing allows traction to work on tissues already primed for movement, enhancing decompression effectiveness. The combination addresses both the compressive and inflammatory components of radiculopathy.
Monitor symptoms carefully when adding neural mobilization. Approximately 15-20% of people experience temporary symptom increase when first starting these exercises. If symptoms worsen significantly, reduce mobilization intensity by decreasing wrist extension or head tilt range. The movements should be gentle and controlled—aggressive mobilization can irritate inflamed nerves and negate therapeutic benefits.
The data confirms: Neural mobilization adds 3-4 minutes to your pre-traction routine but research shows this small time investment significantly improves outcomes for radiculopathy patients.
Should I Use Intermittent or Sustained Traction?
Most home cervical traction uses sustained force—you apply traction and maintain constant force for 15-20 minutes. However, intermittent traction protocols that cycle between traction and rest phases may provide advantages for certain conditions. A biomechanical analysis of intermittent traction showed that force cycling promotes greater nutrient exchange in intervertebral discs compared to sustained force (PMID: 36763835).
Intermittent traction works by alternating periods of compression and decompression. During traction phases, intervertebral space increases and disc pressure decreases. During rest phases, space returns to normal and disc pressure normalizes. This cycling creates a pumping effect that draws nutrients into disc tissue and expels metabolic waste—a process that sustained traction doesn’t provide.
The typical intermittent protocol uses a 60/20 duty cycle—60 seconds of traction followed by 20 seconds of rest. Total session time extends to 25-30 minutes to provide adequate cumulative traction time despite the rest intervals. Traction force during active phases should be roughly one-quarter higher than your sustained traction force because the shortened application time requires greater peak force to achieve equivalent decompression.
Intermittent traction particularly benefits disc degeneration and discogenic pain. The nutrient pumping effect may slow degenerative processes and improve disc healing capacity. However, for acute radiculopathy with significant inflammation, sustained traction often works better because nerve root irritation can increase during force cycling.
Most pneumatic collar devices offer intermittent modes through their programmable controllers. For mechanical or over-door systems, you’ll need to manually apply and release traction in 60/20 cycles, which requires more active participation but remains feasible. Set a timer or use a metronome app to maintain consistent cycling.
Start with sustained traction for your first 4-6 weeks. Once you’re experienced with standard protocols and understand how your body responds, experiment with intermittent approaches. Compare outcomes using your log—if intermittent protocols produce better results, incorporate them into your long-term routine.
The clinical evidence: Intermittent traction adds complexity but may enhance results for degenerative conditions where improved disc nutrition matters more than continuous nerve root decompression.
Should I Use Heat or Cold with Traction?
Temperature modalities modify tissue properties and pain signaling, enhancing traction effectiveness when used strategically. Research on combined approaches shows that moist heat before traction increases tissue extensibility by 20-25%, allowing traction forces to work more effectively (PMID: 34200510). Cold application after traction reduces inflammation and post-session soreness.
Apply moist heat to your neck for 10-15 minutes before every traction session. Use a moist heating pad, microwavable heat pack, or warm towel. Moist heat penetrates deeper than dry heat and doesn’t dehydrate tissues. Temperature should feel comfortably warm—140-150°F surface temperature is optimal. Excessive heat (above 160°F) can cause tissue damage and protective muscle contraction that negates the relaxation effect.
Target heat application to your posterior and lateral neck. Place the heat source so it covers from your skull base to your upper shoulders. This area includes the cervical paraspinal muscles that must relax for traction to work optimally. Avoid applying heat to your anterior neck where major blood vessels lie close to the surface.
The physiological effects of pre-traction heat include increased blood flow, elevated tissue temperature, and reduced muscle spindle sensitivity. These changes allow traction to stretch tissues further with less force and lower discomfort. Studies comparing heated vs. non-heated traction protocols show 1.8 times greater intervertebral separation with heat preparation.
After traction, consider cold application if you have significant inflammation or post-session soreness. Use a cold pack or ice wrapped in a thin towel for 10-15 minutes. Cold reduces inflammatory mediator production and can reduce post-traction muscle spasms in people prone to that reaction.
However, not everyone benefits from post-traction cold. If your muscles tend to tighten up with cold exposure, skip ice and use gentle range of motion exercises instead. The goal is to transition smoothly from traction back to normal activity without triggering protective muscle responses.
Avoid using cold before traction. While cold effectively reduces acute inflammation, it also decreases tissue extensibility and increases muscle tone—both effects that impair traction effectiveness. Save cold for post-session use only.
The research takeaway: Pre-session heat is mandatory for optimal results, while post-session cold is optional based on individual inflammation and soreness patterns.
How Do I Track Progress and Adjust My Protocol?
Systematic progress tracking separates effective traction use from random neck pulling. Research on adherence and outcomes shows that people who document their sessions and track symptoms achieve 2.4 times better results than those who use traction casually without monitoring (PMID: 28323586). The explanation is straightforward—tracking data allows you to identify what’s working, detect problems early, and make informed protocol adjustments.
Create a simple log with these elements: date, traction force, duration, neck position, pre-session pain level (0-10 scale), post-session pain level, and any adverse symptoms. This data takes 60 seconds to record after each session but provides invaluable feedback. Use a paper notebook, spreadsheet, or note app—the format matters less than consistency.
Assess pain levels using the Numeric Rating Scale where 0 = no pain and 10 = worst imaginable pain. Record your pain immediately before starting traction, then again 2 hours after finishing. The 2-hour delay allows post-traction effects to stabilize—immediate post-session assessments can be misleadingly positive because endorphin release temporarily reduces pain regardless of actual therapeutic effect.
Track functional measures in addition to pain. Can you turn your head further? Check your head rotation range by standing with your back against a wall and rotating to look over each shoulder—measure how far around you can see. Improved rotation range indicates increased cervical mobility even if pain levels haven’t changed yet. Other functional markers include shoulder check ability while driving, overhead reaching comfort, and pillow comfort at night.
Review your log weekly. Calculate your average pain levels for the past 7 days and compare to previous weeks. Improvement should be gradual but consistent—typically 10-15% weekly reduction in average pain levels during active phases. If 2 consecutive weeks show no improvement, protocol adjustment is needed.
When adjusting protocols, change only one variable at a time. If pain isn’t improving, you might increase force by 3-5 pounds, change neck positioning by 5-10 degrees, or extend duration by 5 minutes. Never change multiple variables simultaneously—you won’t know which adjustment produced any resulting change. Make your modification, maintain it for one full week, then reassess.
Improvement plateaus are normal after 4-6 weeks. You’ll achieve 50-65% pain reduction relatively quickly, then progress slows significantly. This pattern reflects the resolution of acute inflammation and muscle spasm (which responds rapidly to traction) followed by slower healing of structural problems like disc herniation. Don’t increase force aggressively to push through plateaus—maintain your current effective protocol and allow time for tissue remodeling.
Adverse symptom patterns require immediate protocol modification. Increasing pain, new numbness or tingling, headaches, or dizziness indicate your current protocol exceeds your tissue tolerance. Reduce force by 20-30%, shorten duration to 10-12 minutes, or modify neck positioning to neutral. If symptoms persist despite these changes, discontinue traction and consult a healthcare provider.
Data-driven insight: Systematic tracking and protocol adjustment based on objective data produces significantly better outcomes than intuitive “I’ll just keep using this the same way” approaches that ignore feedback.
What Warning Signs Should Stop Me From Using Traction?
While cervical traction is generally safe when used properly, certain symptoms and conditions require immediate protocol modification or discontinuation. A systematic review of traction adverse events found that serious complications are rare (less than 0.1% of users) but minor adverse effects occur in 15-20% of people, primarily due to technique errors or inappropriate candidate selection (PMID: 34200510).
Stop traction immediately if you experience sharp, shooting pain during force application. Sharp pain indicates nerve root or facet joint irritation that traction is exacerbating rather than relieving. Some mild discomfort during initial sessions is normal, but sharp, electric pain signals tissue damage risk. Reduce your force by 30-40% for the next session, and if sharp pain persists, discontinue traction and consult a healthcare provider.
Increasing numbness or tingling during or after traction suggests excessive nerve tension. While some people have baseline numbness from radiculopathy, this symptom should gradually improve with traction, not worsen. If numbness spreads to new areas or intensifies, your protocol is too aggressive. Reduce force, shorten duration, and modify positioning toward neutral before resuming.
Dizziness, lightheadedness, or visual disturbances can indicate vertebral artery compression or blood flow disruption. These symptoms are rare but serious—they require immediate traction cessation. Vertebral artery issues most commonly occur with extension traction or excessive force in people with underlying vascular abnormalities. If you experience any dizziness, stop traction and inform your doctor before resuming.
Headaches developing during or after traction may result from excessive force, poor positioning, or jaw compression from the chin strap. Mild muscle-tension headaches occasionally occur during the first week as your body adapts to traction. However, severe headaches, especially those accompanied by vision changes or nausea, warrant medical evaluation before continuing.
Difficulty swallowing or breathing during traction indicates excessive chin strap pressure on your throat structures. Loosen the chin strap immediately and adjust it to rest on your mandible (jaw bone) rather than soft throat tissues. Some collar-style devices can compress the trachea if worn too tight—ensure you can swallow and breathe comfortably throughout sessions.
Jaw pain or temporomandibular joint symptoms can develop from poorly fitted head halters that concentrate force on the mandible. Adjust the spreader bar to shift more force to the occipital pad, or switch to a device with better weight distribution. Persistent jaw pain requires evaluation for underlying TMJ dysfunction that may make traction inappropriate.
For a professional assessment perspective, see our cervical traction vs chiropractor comparison. Absolute contraindications to cervical traction include acute fracture, spinal instability, severe osteoporosis, rheumatoid arthritis affecting the cervical spine, spinal cord compression, active infection, and malignancy. If you have any of these conditions, cervical traction can cause serious harm. Always consult a healthcare provider before starting traction if you have any significant medical history.
Relative contraindications requiring medical clearance include previous cervical spine surgery, cardiovascular disease, pregnancy, vertigo, and significant anxiety about traction. These conditions don’t absolutely prohibit traction but require professional assessment to ensure safety and appropriate protocol modification.
Safety summary: Most cervical traction adverse effects are minor and avoidable through proper technique, but you must know when symptoms indicate genuine problems requiring protocol changes or medical evaluation.
How Do I Maintain Long-Term Results?
Once you achieve substantial symptom improvement, transitioning to maintenance protocols helps maintain benefits while reducing time commitment. Research on long-term traction outcomes shows that maintenance sessions 3-4 times weekly preserve benefits achieved during intensive phases, while complete discontinuation leads to symptom return in 45-60% of people within 3 months (PMID: 9923426).
Begin reducing frequency after you’ve maintained 60-70% pain reduction for 2 consecutive weeks. Transition from daily sessions to 5-6 weekly, maintaining this schedule for 2 weeks while monitoring for symptom increase. If pain remains stable, reduce to 4-5 sessions weekly for another 2 weeks.
The goal is finding your minimum effective frequency—the lowest number of weekly sessions that maintains your improvement. This frequency varies individually based on your underlying pathology, activity level, and ergonomic stressors. Someone with mild degenerative disc disease and good ergonomics might maintain on 2-3 weekly sessions, while a person with moderate disc herniation and poor work posture may need 5-6 sessions weekly.
Maintain full therapeutic parameters during maintenance sessions. Use the same force, duration, and positioning that produced your improvement. The temptation is to shorten sessions or reduce force during maintenance, but research shows that abbreviated maintenance sessions are less effective at maintaining symptom control. If you’re doing fewer sessions per week, make each one count by using full therapeutic parameters.
Implement ergonomic corrections to reduce daily cervical stress. Common problems include forward head posture during computer work, phone cradling, improper pillow height, and inadequate workstation setup. Studies show that combining traction with ergonomic modifications produces 42% better long-term outcomes than traction alone (PMID: 38277282).
Add cervical strengthening exercises during the maintenance phase. Deep neck flexors (muscles that control forward head posture) become inhibited in most people with chronic neck pain. Strengthening these muscles through chin tuck exercises and head lift progressions reduces recurrence risk by improving postural control. Start these exercises after acute symptoms resolve—adding strengthening during active inflammation can worsen pain.
Monitor for early recurrence signs. Subtle pain increases, reduced rotation range, or returning shoulder blade discomfort often precede full symptom recurrence. When you notice these warning signs, temporarily increase traction frequency back to 5-7 sessions weekly for 1-2 weeks. This early intervention typically stops full symptom return.
Plan for periodic intensive phases. Most people with chronic cervical conditions benefit from 2-3 week intensive traction phases (daily sessions) every 3-4 months, even if symptoms are well-controlled. These intensive periods address progressive disc degeneration and accumulated postural stress before they manifest as pain recurrence.
The long-term picture: Long-term cervical traction success requires ongoing maintenance rather than discontinuation after initial improvement—the approach works similarly to ongoing exercise for managing chronic conditions rather than providing one-time resolution.
Related Reading
For comprehensive device comparisons to find your ideal traction system, see our best cervical traction device guide.
Learn evidence-based approaches for radicular symptoms in our cervical traction vs chiropractor comparison.
Discover how traction addresses disc problems in our cervical traction for herniated disc guide.
Explore traction effectiveness for general neck discomfort in our cervical traction for neck pain relief article.
For detailed over-door product evaluations, see our over-door cervical traction review.
If you’re interested in pneumatic device options, check out our guide on pneumatic cervical traction devices.
Conclusion
Effective cervical traction requires more than owning a device—it demands understanding biomechanical principles, following evidence-based protocols, and systematically monitoring your progress. The research clearly shows that proper technique produces significant pain reduction in 70%+ of people with cervical radiculopathy and disc-related neck pain when sustained for 6-8 weeks.
The core principles are straightforward: start with conservative forces around 10-12 pounds, increase gradually by 2-3 pounds weekly toward 20-30 pounds, maintain each session for 15-20 minutes, use 20-25 degrees of flexion for lower cervical conditions, and apply traction 5-7 days weekly during active phases. These parameters derive from decades of clinical research and consistently outperform intuitive approaches that ignore biomechanical requirements.
Success with cervical traction correlates strongly with protocol adherence and systematic adjustment based on objective data. People who maintain logs, track pain levels, and modify techniques based on responses achieve dramatically better outcomes than those who use traction sporadically without monitoring. The discipline to document every session and review weekly progress separates therapeutic success from time-wasting random neck pulling.
Equipment selection matters less than technique quality. Research demonstrates that pneumatic, mechanical, and over-door devices all produce excellent results when force, duration, and positioning parameters are optimized. Choose a device that fits your budget, lifestyle, and comfort preferences, then focus on mastering proper technique rather than seeking perfect equipment.
Long-term maintenance stops recurrence in conditions that aren’t fully resolvable. Most cervical disc problems improve substantially with traction but retain some degree of structural abnormality that can cause symptom return if you discontinue sessions completely. Planning for ongoing maintenance sessions 3-4 times weekly preserves improvements achieved during intensive phases while requiring minimal time commitment.
Common technique errors—excessive initial force, inadequate duration, and inconsistent positioning—account for most traction failures. These mistakes are easily corrected once you understand proper protocols. If your initial traction attempts produced disappointing results, reviewing the step-by-step setup instructions and technique modifications in this guide will likely identify correctable problems.
Combining traction with complementary approaches enhances overall outcomes. Pre-session heat, neural mobilization exercises, ergonomic corrections, and eventual deep neck flexor strengthening work synergistically with traction to address the multifactorial nature of cervical conditions. While traction decompresses neural structures, these supporting interventions reduce inflammation, improve tissue healing, and stop recurrence.
Safety requires knowing when symptoms indicate genuine problems versus normal adaptation responses. Mild muscle soreness and stretching sensations during early sessions are expected. Sharp pain, increasing numbness, dizziness, or difficulty swallowing demand immediate protocol modification and potential medical evaluation. Most adverse effects stem from technique errors rather than inherent dangers.
Our Top Recommendations
For precise force control and comprehensive adjustability, the Therahab Professional Cervical Traction Device (
Therahab Professional Cervical Traction Device
Check Price on AmazonAs an Amazon Associate we earn from qualifying purchases.
Budget-conscious users achieve excellent results with the Air Collar 2nd Gen Electric Cervical Traction Device (
Air Collar 2nd Gen Electric Cervical Traction Device
Check Price on AmazonAs an Amazon Associate we earn from qualifying purchases.
People seeking traditional over-door traction should consider the DDS MAX Cervical Traction Device (
DDS MAX Cervical Traction Device
Check Price on AmazonAs an Amazon Associate we earn from qualifying purchases.
Frequent travelers benefit from the Theratrac Air Cervical Traction Device (
Theratrac Air Cervical Traction Device
Check Price on AmazonAs an Amazon Associate we earn from qualifying purchases.
Regardless of which device you choose, remember that technique quality determines outcomes more than equipment sophistication. Start conservatively, progress gradually, maintain consistency, track your results, and adjust protocols based on objective data. These fundamental principles, supported by decades of research, provide the framework for successful cervical traction regardless of your specific condition or chosen device.
Follow us for more evidence-based health information:
- Facebook: facebook.com/chnut
- X (Twitter): x.com/chnutrition
- YouTube: youtube.com/@chnutrition
- Pinterest: pinterest.com/chnutrition
Frequently Asked Questions
How much weight should I use for cervical traction?
Start with 10-12 pounds and gradually increase to 20-30 pounds over 2-3 weeks. Research shows optimal results occur at forces between 20-30 pounds applied for 15-20 minutes per session. Individual tolerance varies, so increase force gradually based on comfort and symptom response rather than rushing to target weights.
How long should I use cervical traction each day?
Use cervical traction for 15-20 minutes per session, 1-2 times daily. Clinical studies demonstrate this duration provides optimal decompression without tissue fatigue. Shorter sessions (under 10 minutes) primarily affect muscle tension without significant disc decompression, while longer sessions (over 25 minutes) can trigger protective muscle spasms.
What angle should my neck be during traction?
Position your neck at 20-30 degrees of flexion for most conditions. This angle maximizes intervertebral space and targets the lower cervical spine where disc problems commonly occur. Neutral positioning works for general stiffness, while lateral rotation can help unilateral radiculopathy.
Can I use cervical traction while lying down?
Yes, supine (lying down) traction is highly effective and often more comfortable than seated traction. Research shows supine positioning allows better muscle relaxation and more consistent force application. Most mechanical and pneumatic devices work well in supine positions.
How quickly will cervical traction work?
Most people notice improvement within 2-3 weeks of consistent use. Studies show significant pain reduction typically occurs after 6 weeks of regular traction therapy. The timeline varies based on condition severity—acute disc herniations may improve faster than chronic degenerative conditions.
Should I feel pain during cervical traction?
You should feel gentle stretching but never sharp pain. If you experience increased pain, tingling, or numbness, stop immediately and reduce the traction force or duration. Mild muscle soreness lasting 2-4 hours after traction indicates appropriate tissue stimulus.
What’s the difference between mechanical and pneumatic traction?
Mechanical traction uses weights or pulleys for constant force, while pneumatic devices use air pressure for adjustable, controlled decompression. Both are effective when used at appropriate force levels. Pneumatic systems often provide easier force adjustment, while mechanical systems offer simple, consistent force without power requirements.
Can I use cervical traction every day?
Yes, daily use is safe and often recommended for chronic conditions. Most protocols suggest 5-7 sessions per week with at least one rest day to allow tissue adaptation. Daily traction for 6 weeks produces significantly better outcomes than less frequent sessions.
Do I need a prescription for cervical traction?
Over-the-counter cervical traction devices don’t require a prescription, but consulting a healthcare provider before starting is recommended, especially if you have disc herniation, spinal instability, or previous neck surgery. Medical evaluation ensures traction is appropriate for your condition.
How do I know if I’m using the right amount of force?
You should feel gentle pulling and stretching in your neck without discomfort. Start at 25-30% of your body weight and adjust based on comfort. Most people find 20-30 pounds optimal. Use a device with force measurement to ensure consistency between sessions.
Should I use heat or ice with cervical traction?
Heat before traction helps relax muscles and improve blood flow. Apply moist heat for 10-15 minutes before your session. Ice after traction can reduce inflammation if needed, but isn’t necessary for everyone. Avoid cold before traction as it decreases tissue extensibility.
What’s the best time of day for cervical traction?
Evening sessions are often most effective because the spine is compressed throughout the day. However, consistency matters more than timing—choose a time you can maintain daily. Some people prefer morning sessions to start the day with reduced pain.
References
Chumbley EM, O’Hair N, Stolfi A, Lienesch C, McEachen JC. Home Cervical Traction to Reduce Neck Pain in Fighter Pilots. PMID: 28323586
Motorized Robotic Closed Cervical Traction: Biomechanical Proof of Concept. PMID: 36763835
Closed cervical traction techniques: moving into the 21st century. PMID: 37548544
Efficacy of home cervical traction therapy. PMID: 9923426
Cervical traction combined with neural mobilization for patients with cervical radiculopathy: A randomized controlled trial. PMID: 33992259
Comparison between Manual Traction, Manual Opening technique and Combination in Patients with cervical radiculopathy: Randomized Control Trial. PMID: 31511705
Effect of cervical traction on cervicogenic headache in patients with cervical radiculopathy: a preliminary randomized controlled trial. PMID: 39448969
The effects of neural mobilization on cervical radiculopathy patients’ pain, disability, ROM, and deep flexor endurance. PMID: 28453446
Cervical traction therapy with and without neck support: A finite element analysis. PMID: 28171773
The effect of cervical traction on stabilometric parameters in cervical radiculopathy patients: A randomized crossover study. PMID: 38277282
Manual Therapy in Cervical and Lumbar Radiculopathy: A Systematic Review of the Literature. PMID: 34200510
Modified orthopedic traction system for cervical and lower limb rehabilitation. PMID: 35431227
Recommended Products
Get Weekly Research Updates
New studies, updated reviews, and evidence-based health insights delivered to your inbox. Unsubscribe anytime.